Submitting your first Google Analytics Reporting API Request
We will code, we will have fun, but you don’t need to know how to code

Submitting your first Google Analytics Reporting API Request
Updates: Google dropped support for the oauth library previously used in this guide, so I am actively updating everything to keep everyone up to date.
Also fixed a minor bug that results in double output thanks to @shoheikato.
Hello everyone, welcome back to Chapter 5 of our Google Analytics Reporting API for Absolute Beginners.
Today we have a special article for you since we are actually going to get our hands dirty and work on submitting a Google Analytics API request ourselves!
If you have never coded before, or are frightened by the prospect of coding, don’t worry, we are going to go really slowly today, and lead you step by step into the process of submitting a Google Analytics Reporting API request.
Considering the audience of this guide, we are also going to touch on a few key coding concepts as well.
Therefore, if you are already a coding ninja, feel free to skip around (we will mark sections that you can skip) and only take in the things that look interesting to you.
We are going to start by introducing you to a few good tools that can support your coding journey along the way and make it relatively painless, and lead you to good resources for you to learn more about them.
At the end of the day, I want to end at a place where you can comfortably submit a very simple session request to Google Analytics and get back some result that you can read in your console — then we can pick it up next time at using the parsed data and presenting it nicely.
Sounds like a plan? Great, we are touching on a lot of topics today so it is probably going to be another long article, but brace yourself and enjoy the ride!
Also, if you run into any questions and technical problems when following this article, please join our Facebook group and ask it there. I will try to be as available as possible in the group to answer your questions either privately or in public!
Let’s get our tools in order

In this tutorial, we are going to use Python for all of our code.
For those of you who are unfamiliar, Python is probably one of the most intuitive and popular programming languages on the market right now and can be used for multiple tasks ranging from website development to deep learning and artificial intelligence.
At the same time, to remove complexities around compiling and file management, we are going to use a tool called Jupyter Notebook, a development system built on top of Python to make ad-hoc programming and coding a lot easier.
Sounds like a lot to install and setup manually?
Fret not, a wonderful package management tool called Anaconda can install Python and Jupyter notebook automatically for you, along with hundreds of other packages that are extremely useful for various programming purposes.
We won’t go into detail about how to do that here since the guides do a much better job than I do, so please refer to the Anaconda installation guide below.
Please note that we are using the python3 distribution of Anaconda in our demonstrations, and would encourage you to do the same.
Anaconda: Downloads - Anaconda
Now let’s install some key packages
After setting up those tools, let’s start our coding journey by setting up our package environment and install some essential packages.
Packages are pre-written codes by nice people who have decided to share their solutions of the specific problems to everyone in the coding community so it can be useful to other people encountering similar problems.
Big companies, like Facebook and Google, also write packages for their APIs and publish it to the coding community to make it easier for developers like us to use their APIs without having to go through the extensive coding process.
To set ourselves up for success using packages, we need to do two things
Set up a virtual environment using Anaconda so we can separate packages used for different purposes and apps
Install the necessary packages for our task at hand.
Let’s begin by setting up a virtual environment.
So here is the deal — you don’t HAVE to set up a virtual environment for your packages, but it is a really good practice to make sure your work is easily transferable to other people in your company.
Essentially, an environment isolates all the packages you use for a specific purpose, and only those packages will load when you active a certain environment.
Using environments to organize your packages will keep your main system environment clean, and avoid package contamination and version conflicts across projects.
Please follow the instructions below to setup your first Anaconda environment!
Managing environments - Conda documentation With conda, you can create, export, list, remove and update environments that have different versions of Python and/or…
After setting up the Anaconda environment, let’s install the necessary packages!
Here is a quick overview of the packages we are going to use/need for our exercise today:
Google Authentication: httplib2, google-auth, google_auth_httplib2
Sending Requests: googleapiclient, google (a hidden dependency)
Data Processing: pandas, numpy, datetime, json
Some of the packages, like datetime and json (which are always italicized), are what we call “built-in” packages of Python, meaning that they come with your Python distribution.
Some other packages, such as pandas and numpy (bolded), are going to be pre-installed along with Anaconda when you setup the system.
So really, the only packages you need to install are the googleapiclient, httplib2, google, and google-auth, google-auth-httplib2 and all you need to do are to type the following commands into the terminal or command prompt (if you are using environment, please make sure you have the correct environment activated).
pip install google-api-python-clientpip install google-auth-httplib2pip install google-authpip install httplib2pip install googleDon’t know where your terminal/command prompt is? Check out the guides below to find out
Windows: How to Open Command Prompt in All Versions of Windows
Mac: Introduction to the Mac OS X Command Line - Treehouse Blog
After installing the packages, all you need to do is to launch your jupyter notebook instance by typing “jupyter notebook” in your terminal.
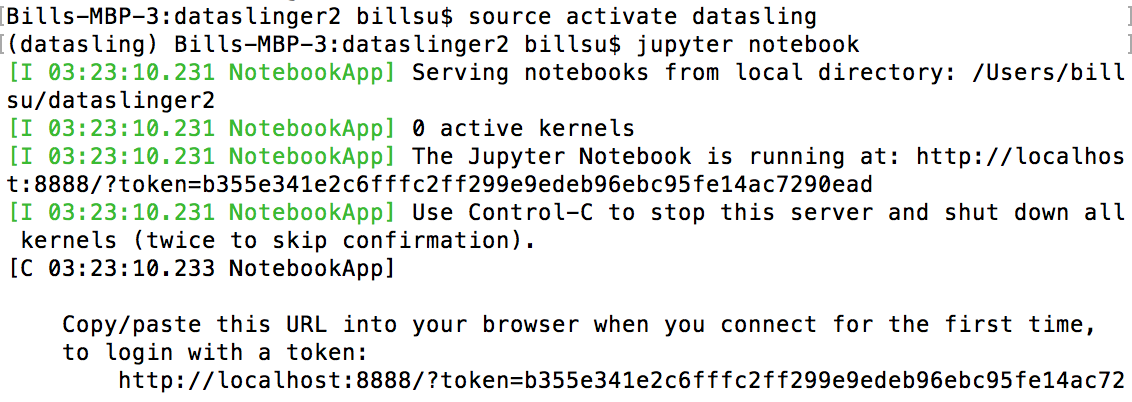
Your browser will automatically launch a window that looks something like this.

Submitting your first Google Analytics Reporting API Request
Create a new notebook on the page that shows up in your browser, then we are ready to begin coding some Python!
Get familiar with Jupyter Notebook and Import Necessary Packages
Let’s begin by familiarizing ourselves with the interface of Jupyter Notebook.
Most of the commands are quite simple and easy to understand (copy, paste, cut, etc.), but I have highlighted a few functions that are very frequently used and essential for our exercises to come.

Submitting your first Google Analytics Reporting API Request
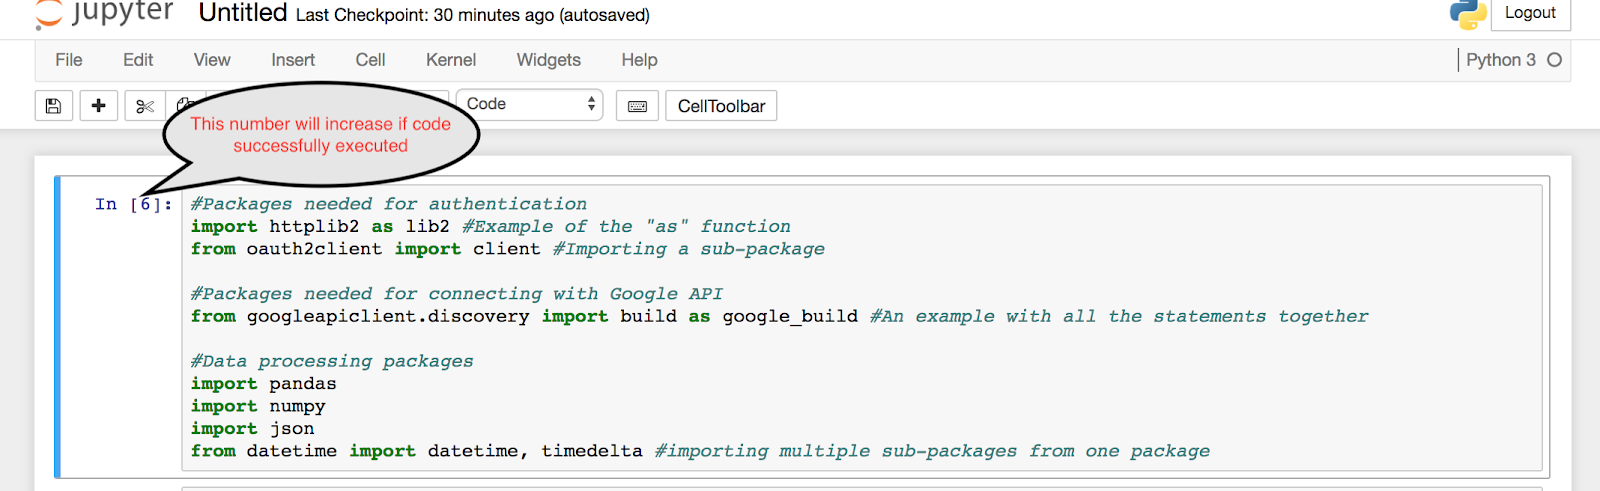
Now, let’s begin coding in one of the code block below by adding our import statement for all of the packages that we need to make our request happen.
Importing packages in Python is surprisingly simple — just type “import <package_name>” as a line of code.
Python packages are usually structured in a hierarchical way, meaning that a package, such as the google-auth package, may have multiple smaller packages, with multiple even smaller packages in those small packages, and so on.
To only import the packages you need, you may use the syntax “from <package.sub_package> import <sub_sub_package>. This is usually used to:
Save loading time for large packages, and
Make the syntax easier to pull.
You may also “import <package> as <your_name>” to make the packages you have imported more accessible and avoid naming conflicts with variables in the code you write.
I have intentionally displayed multiple different ways of importing in the code below to illustrate, and you can simply copy-paste the import statement into your first code block.

Submitting your first Google Analytics Reporting API Requesta
After pasting the code into the code block, click the “Run” button illustrated above to run the code block. After you click it, nothing will happen (this is good news), as we did not request any outputs from the code.
However, you will see your “Ln” number next to code block increase, illustrating the number of code block executions in this run.
Submitting your first Google Analytics Reporting API Request
Set up the project in Google Developer Console and get client token and secret
Welcome to the development world! Now that you are a developer, time to tell Google so it can grant you access to API accesses that are exclusive to developers!
To register your Google Analytics project with Google, simply follow the setup tool in the link below to set up your project on Google Developer Console, it is easy as 1, 2, 3, 4, 5.
Step 1: If you have an existing project, you may have a different screen, but choose “create a new project” regardless unless you have a good reason to integrate with a current application you own.

Submitting your first Google Analytics Reporting API Request
Step 2: Just click the button, nothing much

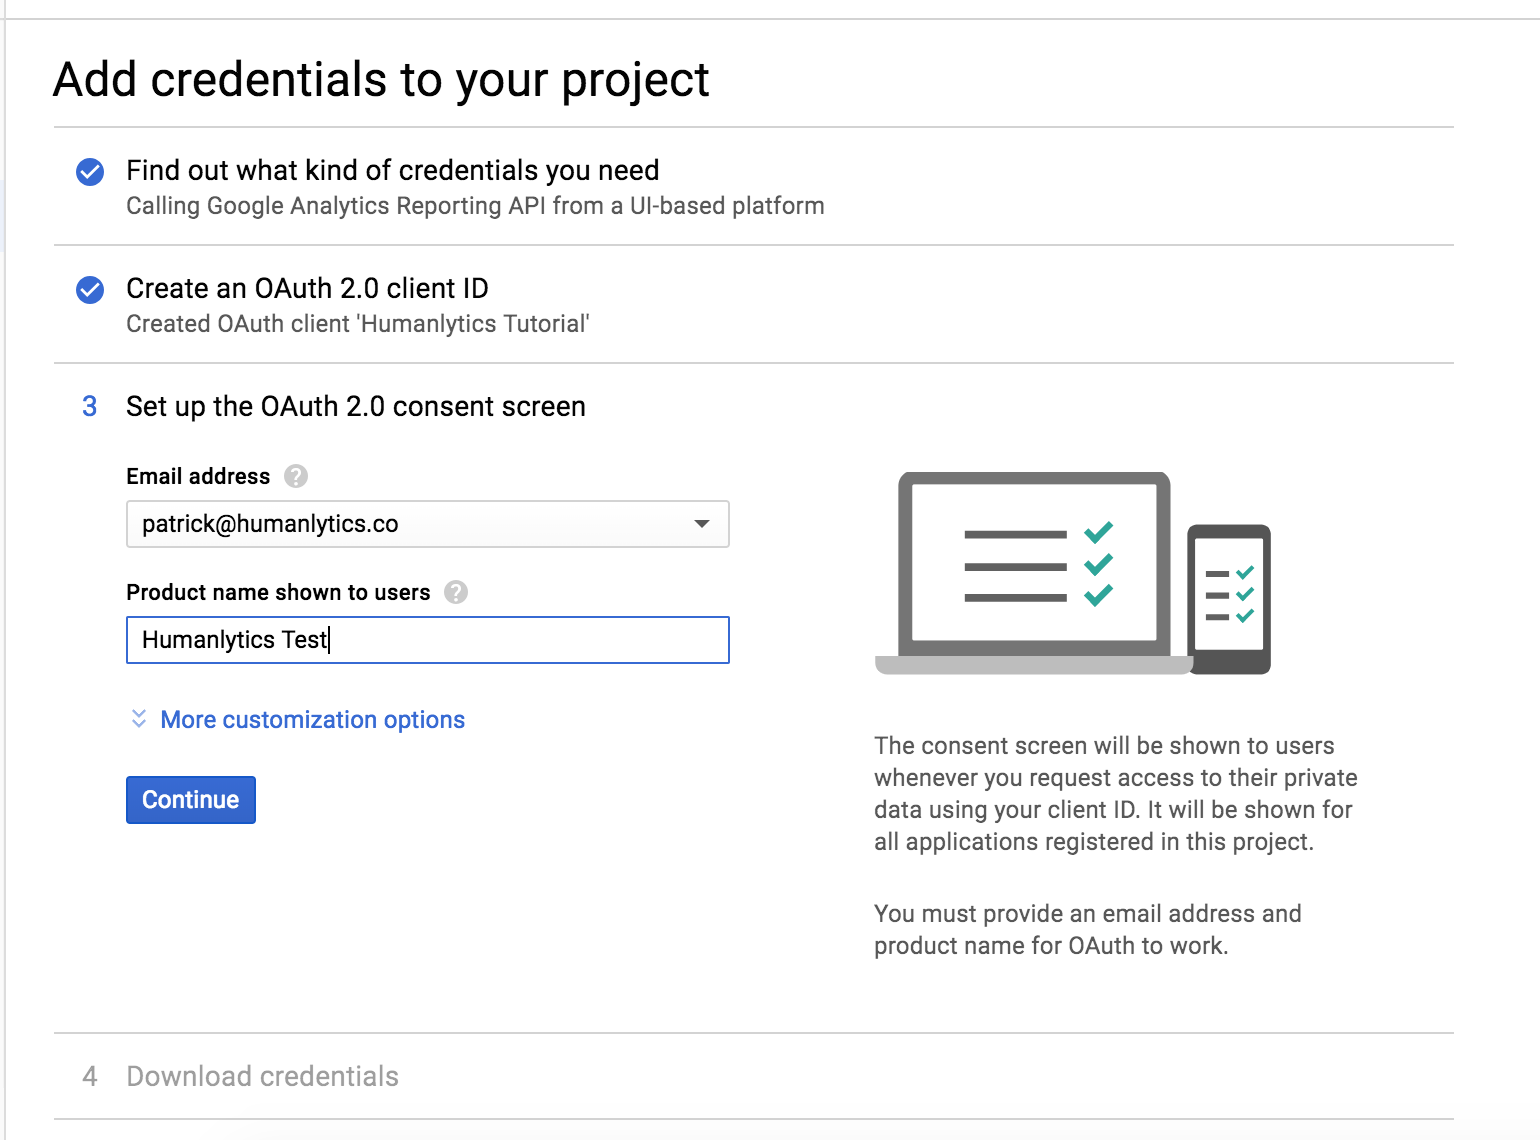
Step 3: Fill this out as below (since ipython notebook is technically a Cli tool).
Update: If you are running into an error during the OAuth Playground stage, please try to create a “web application (instead of Other UI)” client token instead, and in the “Authorized Redirect URIs” field, enter “https://developers.google.com/oauthplayground” as one of the options. Use that token for the following steps.

Submitting your first Google Analytics Reporting API Request
Step 4: There is another screen that ask you to name the app, nothing there so we are going to skip. Then you will see this screen, and you can name it to your liking.
Submitting your first Google Analytics Reporting API Request
Step 5: Click download credential and open the downloaded file with a text editing software, you will find your client id and client secret in there — keep this file open as we will need both in our code.

Submitting your first Google Analytics Reporting API Request
Following all of the steps above, you will have access to your client id and client secret, along with Google Analytics reporting API permission to your project.
Keep those two pieces of information handy, as we will need it to construct authorization credential — now let’s go ahead and get credentials for our Google Analytics account.
Getting authentication tokens and authenticate

OAuth2 is the most popular protocol right now for authorization for all sorts of applications/apis, including but not limited to Facebook, Google, Youtube, and so on.
Let’s explain why we need OAuth2 in plain language.
When running our script, we would need a way to tell the Google API client that we are indeed an authorized user to access a selected Google Analytics account.
The most direct way of authorizing is via username and password, which can be accomplished by sending our username and password for Google to the google api service.
However, this practice is a huge security risk for multiple reasons:
First, if we are using the Google password directly, it would mean that we have to store Google credentials somewhere that is NOT Google’s database.
If I am making an application that services 100 users, I would store the username and password of those 100 users in my database, and there is no way to tell whether I stored a user’s information securely, or if I am selling the user’s information to a third party.
This is a huge security risk for user information, as a simple breach on any of the applications that uses Google services will result in a massive loss in user credentials, essentially paralyzing all Google-related services.
Secondly, sending usernames and passwords to the Google API service would mean that real passwords and usernames will be transferred over the internet, which can be intercepted by the hacker and decrypted to steal your personal information.
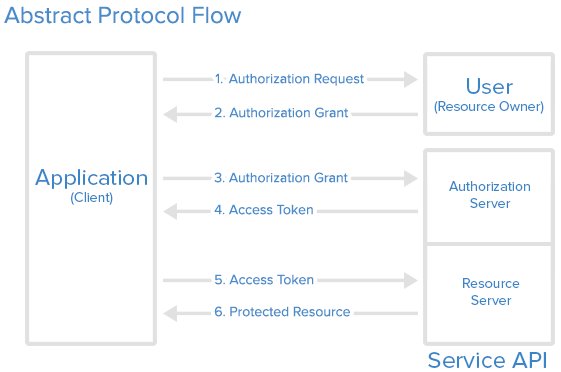
OAuth solves those problems above by offering a slightly more convoluted, but secure way for the user to authorize in a third-party app or script for Google services.
Essentially, instead of sending usernames or passwords to Google directly, the app/script requests a link from Google, where users can sign into their Google Account via this link (it is native to Google) — the third party app/script will not touch the username or password of the user.
Then, if authentication is completed, Google will send the app/script an access token and a refresh token, which will serve as the access code for authorized Google services.
The access token and refresh token can only be used by that specific app, for access restricted information only agreed upon by the users when they sign in and may expire or be revoked at the user’s leisure.
The difference between the access code and refresh code is that the access code is designed to be short-lived, only usually the last few hours.
However, if the app wants continued to access the user’s information, it can refresh the access token by passing the refresh token to Google again, getting a new access token to use — this protects users from unauthorized, permanent access from apps they do not wish to grant permission to it anymore.
Here’s a quick flowchart explaining how that works:
Submitting your first Google Analytics Reporting API Request
So first we get our access token from Google via the Google OAuth 2 Playground link below: OAuth 2.0 Playground
We need to make sure the access token is authorized for our app specifically. You can do that by typing in your own application information (the client id and client secret I told you to keep) in the “Setting” section:

Submitting your first Google Analytics Reporting API Request
Each access token is only granted for a restricted purpose called “Scope” by Google, and we only need view permission for Google Analytics here, so please select that specific scope and click continue:

Submitting your first Google Analytics Reporting API Request
Then, you will be direct to your usual Google login screen, enter the account you use for your Google Analytics account, and then follow the instruction below to get your refresh and access token.

Submitting your first Google Analytics Reporting API Request
As explained in the graphic, keep your access token and refresh token on a separate notepad or word document, as we will use it in the next step.
Now let’s go back to our Jupyter Notebook and start coding the authentication engine
The title of this section might be misleading — we are not going to code our own authentication engine, we are merely going to use the existing ones we have imported from google-auth library previously.
Recall that in the import statement, we imported the “client” object in the google-auth library, now we just need to create a client per instruction of the library and type in the required information.
Update — AKA some rants about the current state of OAuth2 in Google API request
If you were on this guide before, you know that we were using oauth2client package instead of google-auth.
You probably also know that the oauth2client library is a gigantic mess that no one likes to touch.
For this reason, Google dropped support for that package and now encourages us to use the google-auth library instead.
HOWEVER, the google-auth library uses httplib3 for its auth flow, whereas the python API client use httplib2, and, despite similar names, they are NOT compatible with each other.
So we have to install an httplib2 port for the google-auth library, titled google-auth-httplib2 to make everything work.
Overall, in short, it is a mess, but we managed to get it to work, so bear with us :) — resuming normal programming.
If you wish to further explore details of this library, please use the link below, but we are going to handhold most of the code along the way without too detailed of an explanation.
Here, we are going to call and initialize the google.oauth2.credentials.Credentials, which is a client that specifically designed for Google-related credentials. It needs the following information to initialize:
Access Token
Refresh Token
Client ID
Client Secret
Token URL (this is the same for all Google requests)
Token Expiry (this doesn’t really matter, we will just set this to a time before today so the token automatically refreshes)
User Agent (put whatever you wish)
Then, we can simply use the “authorize” method in GoogleCredentials to authorize our client.
To authorize, the client will need a http client since we will be sending the authorization request over http, but it is just one line of code to get that client initialized.
You will find the fully commented code that does everything in this section below, simply replace the strings with your own authorization codes (I will not share mine for obvious security reasons):

Submitting your first Google Analytics Reporting API Request
Run the code snippet again, if it works, it will not return any output as we didn’t request any.
Construct and submit your first request
Setup the API client
Alright, we are almost done with the setup steps. The only thing we need to do is initialize our Google Analytics Python API client.
Here, we need to use a “build” command from the googleapiclient.discovery subpackage and construct an API requester for the Google Analytics Reporting API.
The “build” command takes 3 primary parameters:
The completed authorization engine that we made in the previous step
The definition of the API that we want to call (this is always “analyticsreporting” for our purpose)
The version of the API (we are using “v4”, exclusively)
So, as you can see, we already have all the information needed, so let’s initialize this client in the next codeblock, with a few simple lines of code.

Submitting your first Google Analytics Reporting API Request
Get your view ID for your Google Analytics
Now, it is time to select a view that you want to analyze. You can find the View ID in your Google Analytics interface via the following screen:
Hello everyone, welcome back to another chapter of our Google Analytics Reporting API for absolute beginners.
That is the last piece of information you need to get started using the Google Analytics API.
Submit your first request!
Alright, good news, we are ready to submit a request now!
Since we are already very deep in our exercise, we are just submitting a simple request today: getting total session numbers in the last 30 days of our view.
Let’s construct a “dictionary” object that will encompass that request. We will not go in detail of how to make that request, please refer to the previous chapters of our guide for that:
A Cheat Sheet for Mastering Google Analytics API Requests
The request for our purpose today can be shown below:

Submitting your first Google Analytics Reporting API Request
Now, we just need to use the reports.batchGet method in the Google API Client to call that specific request, which was also shown in the codeblock above.
After running the code, you will finally be able to see some outputs from the console — the data you have requested!

Submitting your first Google Analytics Reporting API Request
However, as you have already see, it is in a format that is not immediately usable to you, which means we will need to parse it!
Parse the JSON results
Parsing the json response is slightly too complex for us to cover in this tutorial, so we are just going to provide you with the utility to do it via the following function, which should be your fourth codeblock.

Submitting your first Google Analytics Reporting API Request
If you are the adventurous sort, feel free to explore the code, but don’t feel too bad if you just copy paste this to your codeblock — I copy pasted this code from someone else too, just did some of my own modifications to satisfy my own needs!
Then, you can simply call the parsing utility in our very last codeblock, and see our data:

Submitting your first Google Analytics Reporting API Request
The data is now in the format of what we call “pandas dataframe”.
Pandas is one of the most popular data analytics/storage library in the Python and data science world, and most of the AI and machine learning packages support (or even require) pandas as an input.
Only want to export your data into csv? Pandas have the simple utility of to_csv to help you do that, just specify a file path you want to export your data to, and you are all set — here is the code blow, along with documentations.

pandas.DataFrame.to_csv - pandas 0.23.0rc2+57.g1185998b6 documentation
Alright! We have come a long way today! But now it is a good place to stop and rest.
Next time in this series, we are going back to finalize our request parameters by talking about segmentation and dynamic segmentation in Google Analytics API — one of the most powerful functions in Google Analytics.
Then, we will come back to the coding world and do more advanced data analytics and visualization exercises with libraries such as sklearn and matplotlib.
This article was produced by Humanlytics. Looking for more content just like this? Check us out on Twitter and Medium, and join our Analytics for Humans Facebook community to discuss more ideas and topics like this!