How to Setup Google Analytics Correctly
A Step-By-Step Tutorial

According to a 2017 survey by Clutch, about 71% of small businesses in the U.S. have a website and understand the value of having a digital presence.
However, having a website is not enough — you also need to make sure that your website is operated and designed in a way that brings in customers and create value for your business. That’s where Google Analytics comes in.
As a free and powerful web analytics tool, Google Analytics is more popular than ever. In fact, W3Techs estimates that about 53% of all websites today uses it — and so should you.
To use Google Analytics, you must set it up correctly, and we have found it to be one of the biggest obstacles preventing small and medium businesses from using the tool. This guide is designed to provide a step-by-step for you to alleviate this pain.
The Battle Plan
Let’s begin with an overview of the major steps that we are going to take.
First, we are going to set up Google Tag Manager on our website.
Then, we are going to set up Universal Analytics (the newest version of Google Analytics) through Google Tag Manager. This will enable Google Analytics to track all pageviews on your website.
Finally, we are going to go back to Google Analytics to set up “goals” and “views.” This will make sure that the data you track is not only accurate but meaningful for your business.
One of the biggest differences between our approach and a conventional Google Analytics setup approach is we stress the importance of setting up Google Tag Manager right from the start.
Google Tag Manager is a free “tag management” solution offered by Google that essentially serves as a “data broker” on your website.
It takes all your website data, and send it to different services such as Google Analytics, Facebook Analytics, and beyond.
We strongly prefer the Google Tag Manager approach for two primary reasons:
If you set up Google Tag Manager, it will be the only time that you touch the codebase of your website. In the future, whether you want to implement additional event tracking, or add a new analytical service such as Hotjar, you will not need to make any direct changes to your website code.
Google Tag Manager provides you with the powerful “preview” function, which helps you make sure that tracking on your website is working correctly.
With all that said, let’s get into the first step — setting up Google Tag Manager.
Setting up Google Tag Manager
Note: In this step, you will need someone with access to the codebase of your website (such as your webmaster). Make sure they are available when you are doing this step.
Google Tag Manager Overview
Google Tag Manager operates on an account and container structure, with one account linking to multiple containers.
For example, if you own a sunglasses company (let’s call it SUN) with a mobile app and an online eCommerce store, you will create one account for your company, and two containers — one for the mobile app, and the other one for the eCommerce store.
Creating your Accounts and Containers on Google Tag Manager
To create your Google Tag Manager account, go to https://www.google.com/analytics/tag-manager/, and click the green button on the top right corner that reads “sign up now for free.”
Here, you will be prompted to sign in with your Google Account. If you don’t have one, create a new one with this link:
https://accounts.google.com/SignUp?hl=en
This Google Account should be a permanent Google account that only you can access. You can always grant viewing or editing access to other people later.
Even if someone else (such as a webmaster) manages your account, still make sure that you have your own account so they can share the ownership permission with you, or else you might risk losing your data when they stop working for your organization.
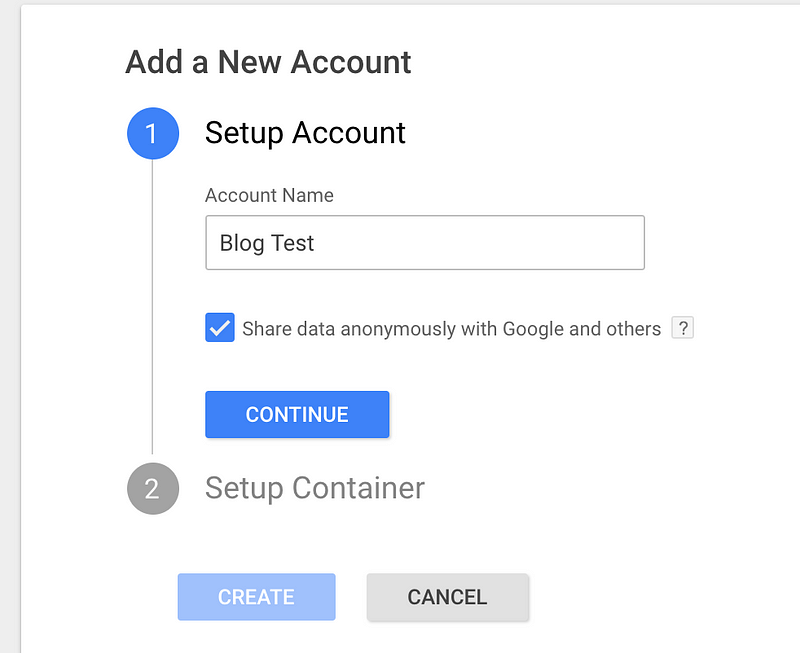
After signing in with your Google Account, follow the setup instructions on the screen to create your tag manager account and your first container. Agree with the Google terms of service.

Injecting tracking code onto your website
After all those steps explained above, you will see a screen like this with your Google Tag Manager code:

As the instructions point out, you need to place two snippets of code onto every single page of your website, one in the header, and another in the footer.
While this may sounds daunting, with modern platforms such as Shopify and Wordpress, you really just need to change only one file in your website directory.
If you use one of the content management systems mentioned above, or even if you have a more sophisticated web app structure, all you need to do is to tell your developers to paste those snippets in the header and body sections of your theme/template file, whether that’s theme.liquid for Shopify, or theme.php for Wordpress.
If you do not have one of those content management systems mentioned above, your developer needs to physically put this code on every page of your website. Also, you should really look into a reliable content management system (CMS) for your website.
After your developers complete this step, you should be all set! Take a breather. Now let’s set up Google Analytics.
2. Setting up Google Analytics via Tag Manager
WARNING: If you are a Shopify user, Shopify has their own way of setting up Google Analytics, so please follow the instructions in this link if you are setting up page tracking for a Shopify website:
https://help.shopify.com/manual/reports-and-analytics/google-analytics/google-analytics-setup
Nevertheless, it is still recommended to setup Google Tag Manager on your Shopify website since it enables dynamic event tracking that is beyond the capabilities of the default Shopify Google Analytics setup.
Google Analytics Overview
Let’s begin with an overview of Google Analytics.
GA (Google Analytics) is organized by a hierarchy of Accounts, Properties, and Views. A property is a website, or mobile app, or a point of sale device (like an external checking service). A view is a filtered version of your website data (e.g. a common view is one that filters out employees at your company because you want to track website visitors, not your employees’ sessions).

For example, if you only have one website, you only need one Google Analytics account with one website property. If you have two websites (e.g. a personal website and a website for your business), you can make two accounts (one for each website).
Set up your first Google Analytics account and property
Use the same Google Account you used for Tag Manager, go to Google Analytics, and sign in.

After you sign up, you can set up your account and website information (e.g. account name, website name, website URL, industry category, etc). Make sure you use the right time zone.

Get your Google Analytics Tracking ID
After setting up your account, you will be directly sent to a page similar to the one that you see below. If not, simply go to the Admin >>> Tracking Info section (it’s under the Property column).

Here, what you are looking for is the Tracking ID of your Google Analytics account. You can either write this code down (or paste it to a word doc), or simply keep the tab open while we set up Google Tag Manager.
Set Up Analytics Tag with Google Tag Manager
Now, it is time to go onto Google Tag Manager to set up our Google Analytics tracking tag.
Go back to tagmanager.google.com, and select the “New Tag” button on the top left of the screen.

A tag has two components: its “configuration,” and its “triggering”. Even though those two terms might sound complicated, here’s an easy way to understand them.
Tag configuration is the destination of the data (in this case Google Analytics). Tag “triggering” is the specific data from your website you want to send to a specific destination (in this case, we are sending all pageview data).
Let’s begin with Tag configuration. Click on the Tag configuration button, and a screen like the one below will show up.

Here, select Universal Analytics, and in the resulting screen (shown below), select “New Variable” under the “Google Analytics Settings” option.

In the resulting screen, set up a variable called “Google Analytics” (or whatever you’d like to call it), and enter your Tracking ID in the corresponding field. Save both the variable and tag configuration, and you are done configuring the tag.

Then, it is time to set up the tag’s “triggering.” In this case, we want to send all pageview data to Google Analytics (the default Google Analytics setting).
Click on the “trigger” area of the tag, and simply select the “all page” option. Then, you are all set, and your tag should look like the following screen.

Save the tag, then click “Submit” on the top right corner of the tag manager dashboard. Write down whatever notes you’d like to describe the actions you took. Congratulations, you now officially have Google Analytics configured properly on your website!
Set up Views and Goals in Google Analytics
Now let’s segue back to Google Analytics to configure a few more settings to make sure that your tracking is accurate and useful.
Setup views to filter your data
The first step is to set up your “Views.” Views allow you to look at your data with certain filters. The default Google Analytics view is “All Web Site Data,” which is unfiltered. You should probably keep this default view so that you can always access all your raw website data.

You can add new views according to the needs of your business. Go to Admin >>> View column dropdown >>> Create new view.

For example, you can add views to filter out certain pages on your website or traffic that does not count toward your goals. I recommend adding a view that filters out employees at your company because you want to track website visitors, not your employees’ sessions.
Set up Goals to track your business objectives
Goals allow you to track important events on your webpages, such as visitors filling out a contact form or spending a certain amount of time on a product page.
For example, let’s say you want to track purchase completions on your website, measured by the number of times a website visitor sees a purchase confirmation (or thank you) page after their purchase.
To go to Goals, click on Admin >>> View (column) >>> Goals.

Click on the “New Goal” button.

Look through the goal templates to see if any of them match the event you are trying to track (e.g. “Make a payment”). If not, click “Custom.”

Give your goal an easy-to-remember name. Select Destination and click “Next Step.”

Find the URL of your confirmation page. Copy the URL segment after the “.com” (e.g. “/confirmation.html”). Paste it in the Destination field and select “Equals to” in the dropdown menu.

If you want to quantify the monetary value of each time this goal is completed, type the dollar value of that action. Click Create Goal.

This is an example of tracking a simple conversion funnel.
You can create up to 20 goals for each website property. Common goals that Google Analytics can track for your business include:
Lead contact form submissions
Email list sign ups
Purchase completions
Visiting pages that suggest an intent to purchase
A certain number of pageviews per session
Spending a certain amount of time on your website in a session
You can then use these goals to add website visitors to retargeting lists for Google Adwords campaigns.

For example, I may want to set up a goal such that if a visitor visits more than 3 pages and spends more than 2 minutes on my websites, Adwords will add them to a retargeting list because I see these visitors as “hot leads.” Adwords can then automatically retarget them with display ads and Gmail ads.
Check out this Google Analytics support page to learn more about how to properly configure goal tracking on Google analytics.
Need Help Setting Up and Configuring Google Analytics? We’re Here to Help
We hope you found this short step-by-step walkthrough of setting up Google Analytics (and Google Tag Manager) helpful. If you have any questions or feedback, please shoot us an email at Bill@humanlytics.co.
Coincidentally, we are offering to properly setup and configure Google Analytics (including reporting and goal tracking) to our beta testers, so let us know if you’re interested in giving us feedback on our tool.
Tune in for our next step-by-step tutorial on how to set up additional event tracking for Google Analytics through Google Tag Manager, along with tips on using the “preview” function of Google Tag Manager to make sure all your trackings are functioning correctly on your website.
If you liked this tutorial, don’t forget to subscribe to our newsletter through the button on the top right corner.